miércoles, 29 de enero de 2014

Colcha de la Amistad/ Friendship Quilt

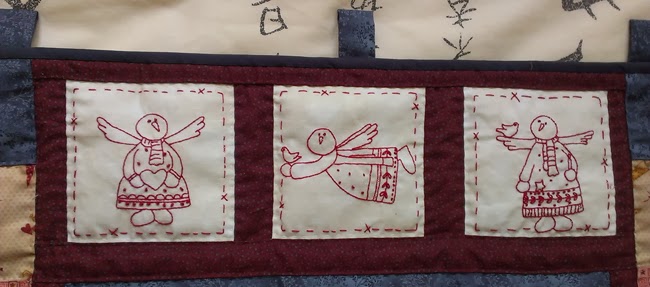
Ya tengo hechos los dos últimos bloques que me faltaban de la Colcha de la Amistad (aquí podéis ver los otros). Ileana y Eliana, que viven al otro lado del charco, nos enviaron el diseño de sus bloques y así el resto los podemos hacer y tener un recuerdo de ellas en la colcha.  
I've already made the two last blocks for the Friendship Quilt (here you can see the others). Ileana and Eliana, who live on the other side of the pond, sent us their designs so the rest of us can sew them and, therefore, they are also part of this quilt. 


Este es el de Ileana, de Guatemala, y, al igual que el nombre de su blog (aquí), ha usado el bordado de una libélula. 
This one is from Ileana, from Guatemala. Like the name of her blog (here), she has used an embroidery of a dragonfly.


Aquí podéis ver un detalle del bordado.
Here you can see the embroidery in detail.


Este es el bloque de Eliana, de Colombia. Ella también ha diseñado su bloque con un bordado, en este caso un corazón.
This is the block from Eliana, from Colombia. She has also designed her block with an embroidery, but in this case she's used a heart.


Muchísimas gracias a las dos por estos diseños, espero que os guste cómo me han quedado!
Thank you very much for your designs, I hope you like them!


Ahora que tengo ya todos los bloques, tengo que pensar cómo voy a montar la colcha. Otras amigas del grupo ya han empezado a montarla. Sole, del blog "Las creaciones de mi vida", la está haciendo como si fuera un tablero de Intelect (Scrabble) y los bloques alrededor. Laura, del blog De-Labuela, la está montando diferente, con un bloque central más grande con un corazón bordado y nuestros bloques alrededor. 
Yo voy a seguir pensando a ver cómo lo monto...
Now that I have all the blocks, I can think about how to assemble the quilt. Some friends of the group have already began. Sole ("Las creaciones de mi vida") is doing it as if it was an Scrabble grid with our blocks around it. Laura ("De-Labuela") is doing it in a different way, with a bigger central block embroidered with a heart and our blocks around it. 
I will continue thinking....

Feliz miércoles!
Have a nice Wednesday!


domingo, 26 de enero de 2014

Calendario de Adviento/ Advent Calendar

Hola a tod@s! / Hi!

Finalmente he acabado el Calendario de Adviento que nos propuso Authen-tic para estas Navidades pasadas.
I have finally finished the Advent Calendar proposed by Authen-tic for last Christmas.


Ya que estaba puesta con él, he preferido acabarlo ahora a dejarlo aparcado hasta las próximas Navidades. 
As I was working on it, I've preferred finishing it now to leaving it until next Christmas.


Se lo regalaré a mis sobrinillos, que seguro que lo disfrutarán mucho más que yo, que no tengo niños :)
I will give it to my nephews, who will surely enjoy more than me, as I don't have any children :)


En estas fotos podéis ver algunos detalles. Como siempre, todo lo he hecho a mano.
You can see some details in these photos. As always, it's all handmade. 


No he hecho ninguna virguería con el acolchado, simplemente he cosido siguiendo todas las costuras, las figuras del Nacimiento y alrededor de cada bolsillo. 
I haven't done any wonder with the quilting. I've simply sewn following all seams, the Nativity figures and around each pocket.


Para el bies, he escogido un tono azul grisáceo. Estuve haciendo pruebas y resaltaban más las telas con este color que con un color rojizo.  
I have chosen a grayish blue for the bias binding. I did some tests and I think that, the colours of the fabrics stood out more with this colour than with a reddish one. 


Y aquí podéis ver la trasera de color verdoso. En realidad, es un verde mucho más vivo. Qué pena que no se aprecie bien en las fotos...
Here you can see the greenish back side. In fact, the green is more bright. What a pity you can't see the real colour in the photos...


Es la primera vez que pongo trabillas para colgar trabajo. Estuve buscando por Internet y encontré el tutorial de Paloma, de Mar de Menorca, donde lo explica de forma muy clara.
It's the first time I put fabric loops to hang my work. I looked for a tutorial in Internet and I found one from Palona, Mar de Menorca, where she explains it very clearly.


Ahora sólo tienen que esperar unos meses para colgarlo jejeje Y yo, ya me puedo poner con otro proyecto :))
Empezad bien la semana!

Now they just need to wait for some months to hang it hehehe And I can start (or continue with) another project :))
Have a nice beginning of the week! 

martes, 14 de enero de 2014

Tutorial Adorno Navidad 2013/ DIY: Christmas Ornament 2013

Como os prometí la semana pasada, os he preparado un pequeño tutorial del duendecillo de Navidad que he regalado a mi familia y amigos estas Navidades. Os podéis descargar el patrón haciendo clic AQUÍ o en la foto del adorno.

As I promised to you last week, I've prepared a simple tutorial to show you how to do the Christmas elf I gave to my family and friends on Christmas. You can download the pattern HERE or by clicking on the photo of the ornament below. 


Como material, sólo necesitaréis 3 telas diferentes y un cordel o cinta para colgar el adorno.
You will just need 3 different fabrics and a string or ribbon to hang the ornament.

Paso a pasoInstructions:

1. Calcar el patrón y cortar dejando un margen de costura.
Trace the pattern, leave a sew allowance and cut.


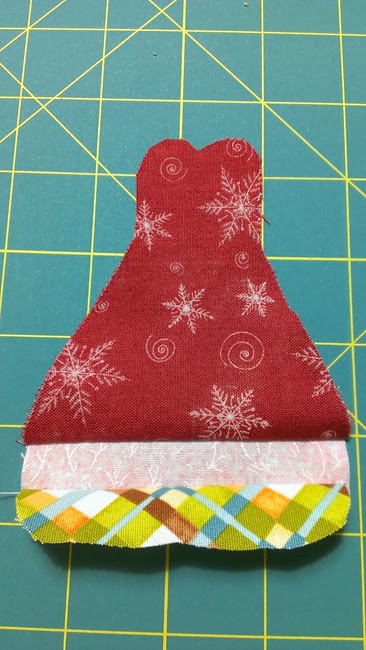
2. Colocar derecho con derecho la tela del gorro con la de la cara y coser por la línea.
Put the hat and the face right sides together and sew along the line.


3. Girar y planchar con la mano.
Turn and press.


4. Colocar derecho con derecho la tela de los pantalones con la de la cara y coser por la línea.
Put the trousers and the face right sides together and sew along the line.


5. Girar y planchar con la mano.
Turn and press.


6. Así es cómo se ve por detrás:
This is how the view looks like from the back:


7. Bordar los ojos y la boca. 
Embroider the eyes and mouth. 


8. Doblar por la mitad las telas, colocar el cordón o la cinta para colgar el adorno como se ve en la foto y sujetar con alfileres uniendo por las líneas del patrón.
Fold the fabrics in half, put the string or ribbon to hang the ornament like in the photo below and pin along the lines.


9. Coser por la línea dejando una apertura para poder girar el adorno.
Sew along the lines leaving an opening to turn the ornament.


10. Girar el adorno. 
Turn the ornament.


11. Poner el relleno por todo el adorno. Os aconsejo ir rellenándolo poco a poco para que no queden "bolas" dentro y quede uniforme.
Fill in the ornament with the stuffing. I suggest that you fill it in little by little to avoid "balls" inside.


12. Finalmente, coser la apertura con puntada escondida.
Finally, sew the opening with hidden stitch.


Y ya esta, ya tenéis vuestro duendecillo de Navidad :))
And here it is, you have now your Christmas Elf :))


Espero que os guste! Ya os digo que, de todos los que he hecho hasta ahora, éste es el que ha tenido más éxito :) Si os animáis a hacerlo, enviadme alguna foto que me hará mucha ilusión.

I hope you like it! I can tell you that, from all the ornaments I've made until now, this is the most successful one :) If you decide to do it, I will be happy to receive your photos.


miércoles, 8 de enero de 2014

Feliz 2014! / Happy 2014!

Espero que hayáis pasado unas Felices Fiestas y que hayáis tenido un buen inicio de año!
I hope you have had a wonderful Christmas and a nice beginning of the year!


Estos días, entre la visita de mi hermana y sobrinillos, regalos, fiestas y comilonas, etc., no he tenido tiempo ni de encender el ordenador. A ver si me pongo al día ahora que ha vuelto la rutina.
These days, because of my sister's & children visit, gifts, meetings and meals, etc., I didn't even have time to open the computer. But I hope I can get up to date with blogs now that the daily routine has come again.


Como sabéis, cada año hago un pequeño adorno navideño que regalo a mi familia y amigos. Este es el que he hecho este año, un duendecillo de Navidad. Estoy preparando un tutorial que os subiré en pocos días por si queréis hacerlo.
As you know, every year I make a little Christmas ornament that I give to my family and friends. This is the one I've made this year, a Christmas elf. I'm preparing a tutorial, which I will publish soon.

Feliz Año Nuevo!
Happy New Year!


miércoles, 18 de diciembre de 2013

Calendario - My Owl Barn Calendar 2014

Como cada año, en Navidades regalaré a mi familia un calendario para colgar en la nevera (o donde quieran). 
This year, I will also give to my family a little present on Christmas Eve: a calendar to hang on the fridge (or wherever they want).

(Imagen de My Owl Barn)

Voy a utilizar el calendario gratuito que nos ofrece My Owl Barn. Hay un montón de ilustraciones para elegir y todas monísimas. 
I'm going to use the free calendar from My Owl Barn. There are many illustrations, and all of them so cute.

(Imagen de My Owl Barn)

Aquí podéis ver el que tengo colgado ahora, diciembre de 2013 (por supuesto, jejeje). 
Below you can see the one that is on my fridge now, December 2013 (of course, hehehe).


Es un regalo que gusta mucho y lo esperan cada año :)
It's a very successful present and they expect it every year :)

Feliz semana!
Have a nice week!

lunes, 16 de diciembre de 2013

Estrellas de Navidad 2 / Christmas Stars 2

Ya están colgadas las estrellas de Navidad que os enseñé la semana pasada ¿Queréis ver cuál ha sido finalmente el proyecto de las chicas de Urban Knitting Barcelona? Lo podéis ver en su blog aquí y aquí.
Me ha encantado participar, gracias por la invitación!

The Christmas Stars I showed to you last week are already hanging. Do you want to see the project made by the ladies from Urban Knitting Barcelona? You can see it here and here.
I'd loved to have taken part in it, thanks for the invitation!


Aprovecho para dar las gracias a Awesome Needles por darme el premio "The Versatile Blogger", me ha hecho mucha ilusión recibirlo :)) Como siempre, os lo paso a tod@s los que queráis recogerlo.

I'd like to thank Awesome Needles to give me the prize "The Versatile Blogger". I was very happy to receive it :)) As usual, I pass it to all of you who want to take it.


Pasad una buena semana!!
Have a nice week!!

lunes, 9 de diciembre de 2013

Estrellas de Navidad / Christmas Stars

El otro día, leyendo el blog de Esmeralda (El baúl de Esmeralda), nos invitaba a participar en un proyecto navideño que está preparando junto con las chicas del Urban Knitting Barcelona para decorar la ciudad con tejidos. El proyecto todavía es secreto, pero para prepararlo necesitan muchas estrellas de ganchillo.

Some days ago, I was reading Esmeralda's blog (El baúl de Esmeralda), and she invited us to take part in a Christmas project she's preparing together with the ladies from the Urban Knitting Barcelona. The project consists of decorating the city, but it's still a secret and they need many crochet stars to prepare it.


He hecho unas pocas. Me hubiera gustado hacer más, pero definitivamente necesito que mis días sean más largos.
Son muy fáciles de hacer, y también pueden servir como adornos navideños para el árbol. El patrón lo podéis encontrar aquí y aquí.

I've made just a few. I'd have liked to make some more, but I need longer days.
They're very easy to do, and they can be very nice Christmas ornaments for the tree. You can find the pattern here and here.


Ahora sólo falta ver con qué proyecto nos van a sorprender :)
Qué tengáis una buena semana!!

Now, we just need to wait to see their project :)
Have a nice week!!

domingo, 1 de diciembre de 2013

Cojín de patchwork / Patchwork Cushion

Después de 2 años de espera, finalmente le he hecho a mi hermana el 3er cojín que le prometí! El primero se lo dí en marzo 2011, el segundo en septiembre 2011 y el tercero ahora!! He aprovechado que esta semana ha sido su cumpleaños para dárselo.
After two-years waiting, I've finally made the 3rd cushion I promised to my sister! I gave her the first one on March 2011, the second one on September 2011, and the third one now!! As it has been her birthday this week, I've taken the opportunity to give to her.


Aquí podéis ver a los 3 juntos. He utilizado las mismas telas en los tres (estaban bien guardadas para no usarlas en otros proyectos jejeje), así que quedan muy bien conjuntados. Y como los otros, está todo hecho a mano.
Here you can see the three together. I've used the same fabrics (I had put them away in a safe place so I couldn't use them in other projects hehehe), so they coordinate very well. And, like the other ones, it's all handmade.


Aunque no se ve muy bien, esta es la trasera, es una tela preciosa de unos colores vivos anaranjados y rojizos. En otra foto más abajo se ve mejor.
Here you can see (but not too well) the back side of the cushion. It's a beautiful fabric with bright orangey and reddish colours. You can see it better in a photo below.
 

El cojín mide 50x50cm (20x20"), igual que los otros, y el relleno es del IKEA. 
The cushion is 50x50cm (20x20"), like the other, and the stuffing is from IKEA.


He acolchado todas las uniones y, en los bloques más grandes, he hecho unas hojas (o corazones, según se quiera ver). 
I've quilted all the strips and, in the bigger blocks, I've made some leaves (or hearts, as you prefer).


Es la primera vez que hago el bies. Hasta ahora, siempre lo había comprado, pero como es una tela tan bonita (aquí sí que se ve mejor), pensé que quedaría mejor con ella.
Estuve buscando tutoriales por Internet, y al final seguí el que hizo Anna Orduña (ver aquí) sobre cómo hacer un bies simple para quilts rectos. Me ha ido muy bien, y para ser el primero que hago estoy muy contenta. No será el últimos, eso lo tengo claro.

It's the first time I made the bias binding. Up to now, I'd always bought it, but as it's a very nice fabric (now you can see it better), I thought it would look nicer with it.
I looked for some tutorials on the Internet, and I finally followed one made by Anna Orduña (see here) about how to make a simple bias binding for straight quilts. To be the first one I do, I'm very happy with it, and I'm sure it won't be the last one.


Espero que empecéis bien la semana!
Have a nice beginning of the week!

Quizás también te interese:

Related Posts Plugin for WordPress, Blogger...